Running a training department means you have a lot of different things to manage at the same time. There are courses to schedule, learners to organize, instructors to assign to courses – you’ll certainly never be short of things to do! Even with the best of intentions, it can be easy to end up disorganized quite quickly, and it can prove very difficult to get back on track again.
Usually, you end up just learning to work with the slightly broken system you’ve gotten used to, even if it’s hard for a new person to navigate, or it’s not the most time-efficient way you could be working.
To us fine folks here at Administrate, this sort of thing sounds like a nightmare! We love organization and getting things done as quickly and efficiently as possible. If you’re wondering if Administrate is the training management platform for you, we’re here today to show you just how much easier we could make your life in one particular area – resource management.
As we mentioned above, you already have loads of things to organize and coordinate (all of which Administrate could also help you do better by the way), and managing resources can be an additional headache. Double booking, rooms half the size you need, or instructors turning up to be greeted with a broken projector are just some of the headaches you could face managing your resources, and if you need to manage resources across different office locations, things can get even more complicated!
Let’s have a little look at all the ways Administrate can make managing and booking your resources easier and more time-efficient!
Let’s Get Organized – Log Everything
The first stage of getting super organized when it comes to your resources is to create a log of all the resources you have. Resources can cover a lot of different things, and won’t just be the first things that spring to your mind such as laptops or books – it can also include things like classrooms and specialist training equipment such CPR dummies and vehicles.
This may be something you already have in something like a spreadsheet or Google Doc, but is that the best way to be storing this data? It’s important that you create a centralized management point for all your resources that all the relevant people can access quickly and easily. You also want to make sure it’s is kept up to date at all times, so that rules a spreadsheet out, as different people could be working from different versions, which would create an organizational nightmare!
You may think Google Docs is the answer, as everyone can edit this online, but can Google Docs link into your events to prevent things like double booking or assigning a resource to the wrong location? No, it can’t, and we’ll talk more about how Administrate can do these things a little further down the post.
The best way to stay really organized is to log all of your resources into a platform like Administrate, where everything is stored in one place, and easy to keep track of and edit.
Let’s walk through how you would input all your resources into Administrate:
Add Resource Types
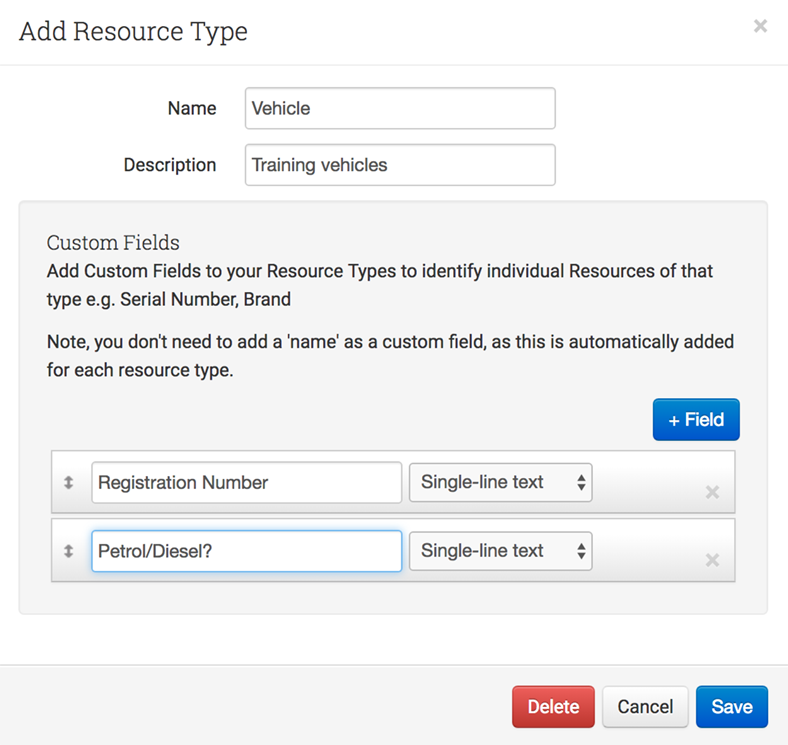
The first thing is to set up is all your different resource types. As we mentioned above this would be things like books, rooms, vehicles, computers, projectors, training equipment, etc. Basically any category which one of your training resources fits under, set up a resource type so that everything is clearly segmented and organized. Depending on the types of training you deliver, you may only have a couple of resource types, or you may end up with dozens – it’s important to make it as compartmentalized as it needs to be for you to manage your resources effectively. Make sure you give each type a clear name and description, so it is clear which resource should be marked with this resource type, for example, you may wish to have Computers – PC and Computers – Mac as different resource types to keep things separate.
Make Use of Custom Fields
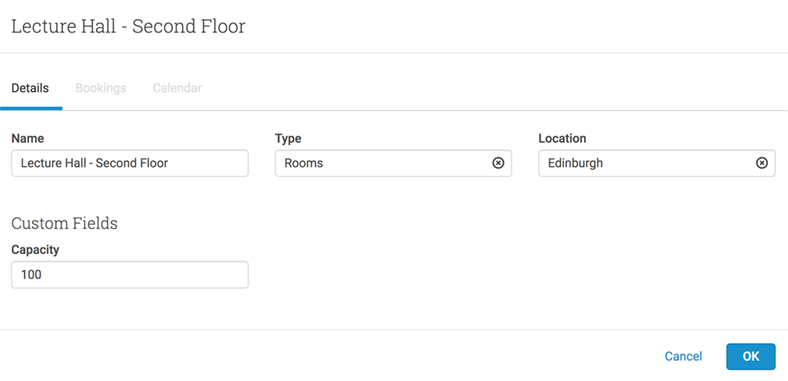
As well as adding a name and description for your resource types, Administrate also gives you the ability to add as many custom fields as you need, with either single or multiple line text boxes. These are great as they will give you the ability to enter additional information when you enter a resource. You may want to enter the registration number of any vehicles you have access to, the capacity for each of your classrooms or the serial numbers of your computers so you can always track exactly where each one is. Simply add a new custom field on the Add Resource Type screen, give it your desired name, and when you add a resource to that particular resource type, your custom text box will be there to enter this additional information in to. Having this additional information is great because it means that all the details are in one place, and you won’t have to go hunting to find out things like room capacity. Your training administrator may know all these facts off the top of their heads, but other members of staff may not, and having it all collected in one place ensures less time is wasted hunting for this information. It also prevents things like people booking rooms that are too small for the required class because they didn’t think to go and find out the capacity in advance.
Add Individual Resources
Now that you’ve set all your resource types, you’ll want to log all your individual resources. On this page, you can enter the name of the resource, select one of your already defined types, and enter the location of the resource, as well as filling out any additional custom fields you have set up.
Being able to log the location of resources is really important if you manage training across a number of locations because you need to know what is available in each location. It also means if someone goes to book a projector that is based in Edinburgh for a class they are teaching in Glasgow, the resource page will clearly display it isn’t based in the Glasgow office, which will prevent them thinking they are organized for their upcoming class when really they are not. The list of locations are the locations you set up in the control panel in Administrate, so make sure you have all your training locations covered so your resources can be organized correctly.
Once a resource is entered into the system, you are able to mark whether it is in service or not. You’ll still want to keep track of things that are perhaps broken or need to be updated but you’re planning to fix or replace in the future, so don’t leave these items out of your logging process.
Viewing Your Resources
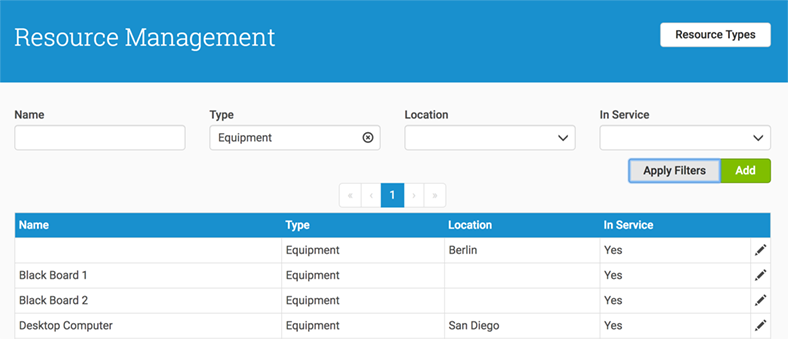
Once your resources are added into Administrate, they will all be displayed on the Resource Management page in one big list. To make it easier to find what you’re looking for, you can search this list by name, or filter it by type, location, or whether the item is in service or not.
Being able to filter by location like this means you can easily see all the resources you have in a particular location, so you know exactly what is available for each location’s training sessions.
As we mentioned above, being able to filter by whether something is in service or not is also really handy. Perhaps you only have the budget once a year to replace broken or out of date pieces of equipment. With Administrate you can simply filter all your resources to only show the ones that are out of service, and you have a pre-made list of all the things that need to be fixed or replaced so you can have a full quota of resources again. Usually, this could mean a lot of hunting around, over several locations, and probably a lot of emailing back and forth with other people to try and track down all the broken equipment, so think of how much time you could save by just having all this information a click away at all times!
Finally, being able to filter by type is also extremely useful. Not only will you be able to see all the computers you have on offer if you’re looking to book one for a training session, but it also means you can do things like easily produce a list of all your electrical resources when it comes time for their regular electrical safety test. Again, no more hunting all over the place trying to find a projector that you think you have, but someone actually threw away three months ago, and equally, you won’t miss out testing a vital piece of equipment to make sure it’s still safe to use.
This is why it’s so vital to make sure all your resource information is kept up to date at all times. Make sure you put a process in place with all your staff to either keep the resources they use updated themselves or make sure they know who to email to alert them to any changes, so the information can be entered into Administrate.
Having an overall view of every resource you have within your business is great for your internal training staff when they are organizing courses, but also great from a budgeting point of view. You’ll always know exactly what you have, so you won’t end up buying extra books and then finding some copies hidden away in a random classroom. It also means you can clearly see which resource areas you are actually lacking in, which gives you more than enough notice to purchase the resources you need before a class actually starts. You don’t want to give a bad impression to your learners by not having everything you need to teach a class properly, so make sure you always know exactly what you have and where it is.
Booking Your Resources
As we mentioned above, a huge reason to log your resources in Administrate over something like a Google Docs is the fact the information can be tied into your events, so you can book resources to particular events with ease, and prevent things like double bookings.
On your setup page for each of your events, you’ll find a resources section, which allows you to view all the resources you’ve already assigned to that event, add new resources, and remove any resources you no longer need.
Let’s take a look in more detail at the different ways you can book your resources onto events.
Book for Exactly the Time You Need
When you choose to add a new resource to an event, you will be asked to confirm whether you want to add it to the whole event (which means it will be applied from the start time of the first session until the end time of the last session) or whether you just want to add it for each session (meaning it will only be booked out for the specific hours a session runs each day).
If you’re doing something like training with a forklift truck offsite, then booking it for the whole event would make sense, as chances are it won’t be realistic for someone else to come and use the resource between sessions when you’re not using it. However, if you’re booking something like a projector, you may wish to just book it out for each session. If your classes only run in the morning, classes that run in the afternoon will still be able to use the projector if you don’t have it booked out. This is great news for you as it means you won’t need to purchase additional resources to make sure every class has one of everything, you just need to make sure you are smart about the way you are booking your resources.
However, you can also get even more specific and pick the exact times you want to book a resource out for. If you select to book a resource for the whole event, it will display the booking start date and time, and the booking end date and time. You may want to change this for a number of reasons:
- If you need a lot of set-up time you may wish to book a room for a few hours before, or even the day before to ensure everything is set up properly before any learners arrive.
- If you need to clean up after your training, again you may wish to add some extra hours on to the end of your booking to make sure you’re leaving the room in a usable state for the next people who are coming in.
- You may actually only need the resources for the first few sessions, but not the last few. This could cover situations like running first aid training and only needing a CPR doll for the first few sessions. There’s no point in booking it out for the entire course, as you could be preventing another class from using the doll. This may mean you need to purchase another CPR doll if you think two classes need to use it at once, and specialist equipment like this is not cheap. Use the booking start and end section to pick exactly the days and times you need to use something, and then you’ll never be holding on to a resource for no reason and giving other people the impression it’s in use.
Small changes like this can help save you money by not having to buy additional resources when they aren’t actually needed and make sure you make the most of the resources you currently have by organizing them as effectively as possible.
Never Double Book Again
As we mentioned above, double booking a resource can be a total nightmare! If you’re keeping track of things on multiple systems or spreadsheets, it can be easy for things to get mixed up. This is especially true if you don’t have a clear resource booking system in place within your business, as people may just take items for a class without alerting anyone, and this can make things difficult to track.
Administrate is designed so you can never double book a resource for two events running at the same time. Not only will this save a lot of mix up and confusion on the day, it will also alert you early if all the computers are already booked on the day you need to schedule a new class, so you’ll know in advance if you need to purchase or borrow an additional computer to be able to run the class. Or you may simply wish to plan the class for another day if you require something quite large, such as the biggest room at your disposal, or a specialist vehicle for the training, as you may not be able to arrange replacements for these. Either way, the double booking alert should give you enough time to sort out an alternative.
When you click to add a resource to an event, the list to pick from will only show the list of available resources. That means if you’ve already booked a resource on an event that clashes with the one you’re currently trying to set up, it won’t display on the list. That means you can’t even double book something by accident!
Similarly to this, if you’ve marked a resource as not in service, these also won’t be displayed on the list, so you never need to worry about turning up on the day and your projector being broken!
View Your Bookings
Once you have booked resources onto events, there are a few different ways you can view them, depending on the information you need to see. Administrate is designed to make it really easy to see exactly what you need to see, so you don’t spend loads of time fighting through the system trying to find the right data.
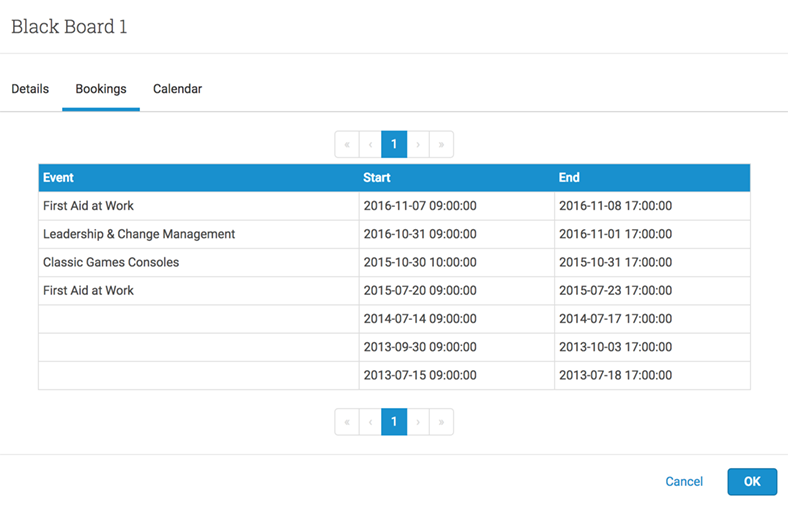
- View all the bookings per resource. In the resources list, you can click on each individual resource and see all the individual bookings the resource has been assigned to. You can view the full list of all the bookings, or view it on a calendar if you prefer that overview.
- View resources booked for the whole event. If you’ve chosen to book a resource for an entire event, you can click on the event and all the resources will be displayed in a list, so you can check you have everything you need in place.
- View resources per session. If you have resources booked for each session, you can view that on the Outline tab on the event page. It will show you a complete list of all the sessions that are running for that event and will display the resources that have been booked for each individual session. This gives you the chance to see whether you really need a resource for all the booked sessions, and you can simply remove resources from the individual sessions that don’t require the resource. You can also use this screen to add resources to individual sessions if you prefer.
You can also view a complete list of all the bookings that have ever been made for a resource. This is really handy if a resource goes missing, or someone forgets to collect a resource at the end of a class because you will have a pre-made list of the last place the resource was used, which should make it easier to track down any misplaced resources.
Get Organized
This is just one of the ways that Administrate can help you be really organized and make sure no one in your training department is spending more time than they need to on administrative tasks.
If just one small change in the way you manage your resources could make such a difference to your business, just think what else Administrate could do for you?
If you’d like to find out more, why not meet with us, and we can talk you through the parts of the system that would benefit you the most!


