Triggers automatically send communications by email or SMS when a defined condition is met. Use them to automate messages for registrations, event reminders, booking workflow transitions, LMS expiry, achievements, and other communication scenarios in Administrate.
Communication Triggers in the Communications area.
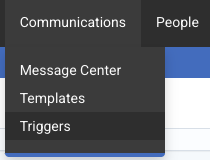
Triggers work together with your communication setup:
- Sending Addresses define where communications are sent from.
- Communication Templates define the message content.
- Triggers define when the communication should send.
Caution
When building a new trigger, start in manual mode first. Test the communication and confirm the audience, content, and timing before enabling automatic sending.
On this page
- Quick start
- Before you build triggers
- How to use this guide set
- Specialized trigger types
- Related guides
- Detailed reference
- Create a Trigger
- Manage Triggers
- Manual sending
- Trigger types, targets, and audiences
- Target reference
- Audience reference
- Trigger activation points
- Scheduled targets
- Award Achievement Triggers
- Booking Workflow Communication Triggers
- LMS Expiry Trigger
- Automation schedule
- Trigger logs and delivery statuses
- Multi-company
- Frequently asked questions
Quick start
- Create or confirm the communication template you want to use.
- Create a trigger and choose the correct trigger type.
- Start with manual sending to validate behavior.
- Enable automatic sending once testing is complete.
- Use Trigger Logs to monitor delivery and troubleshoot issues.
Before you build triggers
- Confirm recipients have valid email addresses or mobile numbers, depending on the channel you plan to use.
- For SMS, make sure mobile numbers are stored in international format.
- Review Sending Addresses and System Emails if you need to validate sender setup or email delivery behavior.
How to use this guide set
If you are new to triggers, follow the articles below in this order:
- Creating and Managing Triggers
- Trigger Types and Timing
- Trigger Schedule and Delivery Timing
- Trigger Logs and Monitoring
Specialized trigger types
Related guides
Detailed reference
The sections below provide detailed setup, timing, target, audience, automation, monitoring, and troubleshooting guidance for Communication Triggers.
Create a Trigger
- Go to Communications > Triggers.
- Switch between the Email and SMS tabs depending on your desired channel.
- Click Add to create a new Trigger.
- Fill in:
- Name
- Abbreviation
- Template (message to send)
- Target (for example Event, Course, Booking, or Learning Path)
- From (your sending address)
- Automatic to enable automated sending. Recommended default while testing: Manual.
- Disabled to control whether the Trigger is currently active
- Trigger Condition (for example Event start/end offset, On Registration, or Scheduled)
- Audience (for example Students, Instructors, or Staff)
- Click Save.
Note
To send an SMS to a contact, the contact’s Mobile field must be populated in international format.
- Example 1: If the contact has a US cell number 8887776666, it must be entered as +18887776666.
- Example 2: If the contact has a UK mobile number 07777888999, it must be entered as +447777888999.
Manage Triggers
You can manage your triggers from the Triggers table, which supports:
- Search and filtering by name, abbreviation, audience, and other fields
- Sorting by column headings
- Actions such as edit, duplicate, delete, and disable
Manual sending
Tip
While testing, keep Triggers set to Manual so you can review them before sending. Switch to Automatic only when you are confident in the behavior.
Even when set to Manual, you can send messages directly from:
- The Personnel section on an Event
- The Students section of an Event
- The Trigger Logs page
Trigger types, targets, and audiences
Target reference
The Target defines which Administrate feature the Trigger applies to. Additional options may be revealed depending on the selection.
| Target | Description | Additional Options Revealed |
|---|---|---|
| All Events | For every Event created | None |
| All Sessions | For every Session on an Event | None |
| Course | For every Event created from one or more specific Course Templates | Use Add Courses to select courses. Course History shows when a course was added or removed and who made the change. |
| Course Sessions | For every Session from one or more specific Course Templates | None |
| Single Event | For one specific Event only | Search box to select the Event |
| Booking | For a specific Booking Transition, such as when a Booking moves from one stage to another | Search box to select the Booking transition |
| Scheduled | For regularly sent communications at Daily, Weekly, or Monthly intervals | Email addresses and frequency selection |
| All Learning Paths | For every Learning Path created | None |
| Single Learning Path | For a specific Learning Path | Search box to select the Learning Path |
Note that selecting a Single Event without a start date or end date, as can happen with some LMS events, limits the available trigger types to those that do not use the event start or end date.
Audience reference
The Audience is the group of intended recipients. This is similar to Template Audiences.
| Audience | Who receives it? |
|---|---|
| For all targets | |
| Students | Contacts registered for an Event |
| All Staff | Administrators and Instructors for the Event |
| Administrators | Those who organize and manage the Event |
| Instructors | Instructors who deliver training for the Event |
| Learner Booking Contacts | The Contact who booked unnamed students |
| For the Booking target only | |
| Contact | The Contact selected on the Booking |
| Owner | The User who owns the Booking |
Trigger activation points
The trigger condition defines when the Trigger activates. Scheduled Targets do not use these activation settings.
| Activation Point | Behavior |
|---|---|
| Targets: All Events, Course, Single Event | |
| Event Start | Activates based on the Event start date, with optional day or hour offsets before or after the start. |
| Event End | Activates based on the Event end date, with optional day or hour offsets before or after the end. |
| On Registration | Activates when a student registers for an Event. Useful for confirmations, welcome messages, and joining instructions. If you have an On Registration trigger set up for Learning Paths, it suppresses On Registration triggers for the individual Events within that path. Offset-based triggers for those Events still fire as normal. |
| Targets: All Sessions, Course Sessions | |
| Session Start | Activates based on Session start, with optional day or hour offsets before or after the start. |
| Session End | Activates based on Session end, with optional day or hour offsets before or after the end. |
| Targets: All Learning Paths, Single Learning Path | |
| Student Completed Path | Activates once the student has completed their assigned Learning Path. |
| Target: Booking | |
| Booking Transition | Activates when a specific Booking workflow transition occurs. |
| Targets: Events, Learning Paths | |
| On Cancel Learner in the Booking Portal | Activates when a learner is cancelled in the Booking Portal. It does not fire when cancelling directly on an Event or Learning Path in the TMS. |
Note that selecting Event Start or Event End limits Single Event targets to Events that have the required date set.
Scheduled targets
Scheduled Targets are used for communications sent at regular intervals to one or more specified email addresses. This is useful for recurring notices, bulletins, or report-style communications.
When you select the target Scheduled, Administrate reveals fields for recipient email addresses and the sending frequency.
Note
Scheduled triggers are processed a few minutes before send time and may send a few minutes early. If you schedule a trigger for 00:00 and the template includes a report based on same-day data, the report may reflect the previous day. In these cases, use 01:00 or later.
| Frequency | Behavior |
|---|---|
| Daily | Sent every day |
| Monthly | Sent every month on a specified date |
| Weekly | Sent every week on a specified day |
| Time | The expected send time based on the company timezone |
| Timezone | All scheduling and delivery calculations use the user’s company timezone |
Award Achievement Triggers
If you use triggers to send achievements such as certificates or badges, an additional option appears in Trigger setup.
When your trigger type is On Award Achievement, you do not need to attach the certificate to the Template. Administrate automatically attaches the certificate for you.
You can also choose whether the email should still send if there is a problem generating the certificate.
Why might a certificate fail?
- You may have mistakenly deleted the background image from DMS
- You may have mapped a merge field that contains no information, such as an instructor name when no instructor is assigned
- You can go to the Event and regenerate the certificate to help identify the problem
- Alternatively, contact Support for further guidance
Booking Workflow Communication Triggers
Why use booking communication triggers?
Communications that are automatically triggered as sales progress is an extremely flexible and powerful feature. Common use cases include:
- Keeping internal teams up to date on how specific Bookings are progressing
- Notifying the prospect itself of advancement in the process, which is useful for students who have submitted applications
- Supporting external integrations or workflows that need communications to fire as students move through the sales or application process
There are many other use cases, and just as the Booking workflow is configurable, the communications that support it can also be configured.
How to set up a Booking trigger
- First, configure your Booking Workflow, including the Transitions you want.
- Build a Communication Template that contains the audience you want to mail and the content you want to send.
- A booking recipient trigger will send to a static email address or addresses like a scheduled trigger, and this is specified on the trigger during creation.
- Set up a Trigger that uses the Booking Transition you defined as a trigger point. Start with Manual while testing.
- Review the configured communication on the Booking Transitions configuration screen.
LMS Expiry Trigger
The LMS Expiry feature allows you to send automated communications to students on eLearning Events based on their Access Expiry date for the Event.
The LMS Expiry trigger can look at each student’s achievement status and fire only for those not yet showing PASS or FAIL. If you prefer, you can configure it to send regardless of achievement status.
Note
This trigger does not work for Classroom Events. In LMS Expiry setups, the Classroom option should remain set to No.
The LMS Expiry Trigger works with these targets:
- All Events
- Course
- Single Event
To set an Access Expiry date on an Event:
- Open the Event
- Click the Access duration field
- Enter the number of days
For example, if you set Access duration to 30, a student’s access to the content expires 30 days after registration.
Note
If the student registered for the LMS Event with a Training Pass, the LMS access expiry date is determined by the Training Pass expiry date instead.
When you select LMS Expiry as your Trigger, Administrate displays an additional offset field. This offset is calculated from the student’s LMS expiry date.
After choosing your audience, you will see a checkbox named Only students without a Pass or Fail Result. Checking this box sends the communication only to students who do not yet have PASS or FAIL set on their student record on the Event.
If you do not check this option, the trigger fires for any student on the Event when the offset date from their LMS Access Expiry date is reached.
Automation schedule
- Priority Run: On Registration triggers run every 5 minutes.
- Full Run: All other triggers run at the 37th minute of every hour.
Trigger logs and delivery statuses
From Trigger Logs, you can:
- Preview communications
- Send or resend communications manually
- Review delivery and processing statuses
Email statuses
| Status | Meaning |
|---|---|
| Clicked | The recipient clicked a link in the Trigger email. |
| Deferred | The recipient mail server asked the sender to slow delivery. This is not a rejection. Retries may continue for up to 72 hours. |
| Dropped | The recipient address is on a suppression list and the email will not be sent. |
| Bounced | The contact’s email address is no longer valid. |
| Error | Review the Notice column for more information. |
| Future | Queued for sending in the future. |
| Historical | A person has retrospectively met the criteria for the communication. |
| Invalid | The email address is invalid, or there may be a problem with an attachment or merge field in the Template. |
| Not Yet Processed | The intended recipient has not yet met the criteria set. |
| Opened | The recipient opened the Trigger email. |
| Rejected | The recipient mail server did not accept the email. |
| Sent | The Trigger email has been sent. |
| Soft-Bounced | The email reached the recipient mail server but was then rejected. |
| Timed-out | The Trigger email is too far past the sending date. |
| Unsubscribed | The contact has the No Mail setting enabled. |
| Hold | The trigger is set to Manual and must be sent manually. |
| No Communications | The contact has the No Communications setting enabled. |
SMS status
| Status | Meaning |
|---|---|
| Done | The Trigger SMS has been sent. |
You can also review Trigger communication activity from the Event Communications tab.
Multi-company
In a multi-company setup, each company manages its own triggers. Triggers set to All Companies act as global triggers and apply across every company.
Frequently asked questions
- When are communications sent?
- Why don’t my emails appear to be sent by the Sending Address I specified?
- What are Next Priority Run and Next Full Run?
- Can I print out my communications?
- Does my Trigger email need a To address?
- What are hourly triggers?
- How precise is the timing?
- Are there limitations with large recipient lists?
- Why didn’t my email send on time, or why hasn’t a trigger fired yet?
When are communications sent?
| Trigger Set To | Sent |
|---|---|
| Registration | Within 5 minutes of the student being added to the Event |
| Days Before | At 00:00 UTC on the nth day prior to the Event starting or ending, or on registration if that day has already passed and the Event began less than 30 days ago |
| Days After | At 00:00 UTC on the nth day after the Event starting or ending, or on registration if that day has already passed and the Event began less than 30 days ago |
Example: if an Event starts in 10 days and a Trigger is set for 5 days before start, a student added today will receive it 5 days before the Event. If a student is added on the Event start date, they may still receive the email upon registration.
Why don’t my emails appear to be sent by the Sending Address I specified?
Administrate uses a third-party provider to send emails on behalf of clients. This can be one reason emails land in spam or junk folders or appear to come from the provider rather than your configured sender.
To ensure Administrate can reliably send email from your address, domain authentication may need to be configured. If needed, work with Support and your domain administrator to set up the required records.
What are Next Priority Run and Next Full Run?
- Next Priority Run: sends On Registration triggers every 5 minutes on the hour, for example 12:05, 12:10, and 12:15.
- Next Full Run: sends all triggers not set to On Registration at the 37th minute of every hour, for example 12:37, 13:37, and 14:37.
Can I print out my communications?
If postal correspondence is preferred, open the relevant Template or Trigger Log item and use your browser or computer print options.
Does my Trigger email need a To address?
Yes. Every Trigger email requires at least one valid address in the To field. If there is no valid To address, the Trigger is marked as Invalid.
A CC address alone is not enough to allow sending. An administrator must add a valid To address and then resend the communication.
What are hourly triggers?
Hourly triggers are scheduled using an hourly offset, which can also be combined with day offsets. For example, a Trigger can fire 1 day and 2 hours after an Event milestone.
How precise is the timing?
There is an expected buffer of up to 15 minutes. Messages may not send at the exact minute configured but should arrive within the normal processing window.
Are there limitations with large recipient lists?
Yes. Large recipient groups can take longer to process and deliver. For very large Events, delivery may take up to 15 minutes or longer.
Why didn’t my email send on time, or why hasn’t a trigger fired yet?
This can happen if the Trigger was created too close to the intended send time. Administrate needs lead time to process and schedule communications.