Merge fields are the codes used inside Communication Templates to automatically pull data from your Administrate instance into an email or SMS, such as a recipient’s name, an Event’s location, or an Instructor’s details. This article covers how to select merge fields, the available Merge Field Macros, advanced date and time formatting, and answers to common merge field questions.
Note
This article assumes you’re already familiar with creating and editing templates. For template types, audiences, translations, and previewing, see the main Communication Templates article. Which merge fields are available also depends on the selected Audience — for example, the Scheduled audience does not support merge fields.
On this page
- Using the Merge Field Picker
- Merge Field Macros
- Advanced date and time formatting
- Frequently asked questions
Using the Merge Field Picker
Merge fields are a set of codes that insert text from your database into a template automatically. This means you can include data specific to each recipient without manually editing the template before sending each email — for example, inserting the recipient’s name so that every email appears personalized. You can use merge fields in both the Email Body and the Email Subject Line.
Note
We recommend using the Merge Field Picker button ( ) rather than typing codes manually, even if you’re familiar with them, to avoid typing errors.
You navigate the fields according to how they are categorized. For example, to select the merge field for the name of the Instructor on an Event, follow: Event → Instructor → Name.
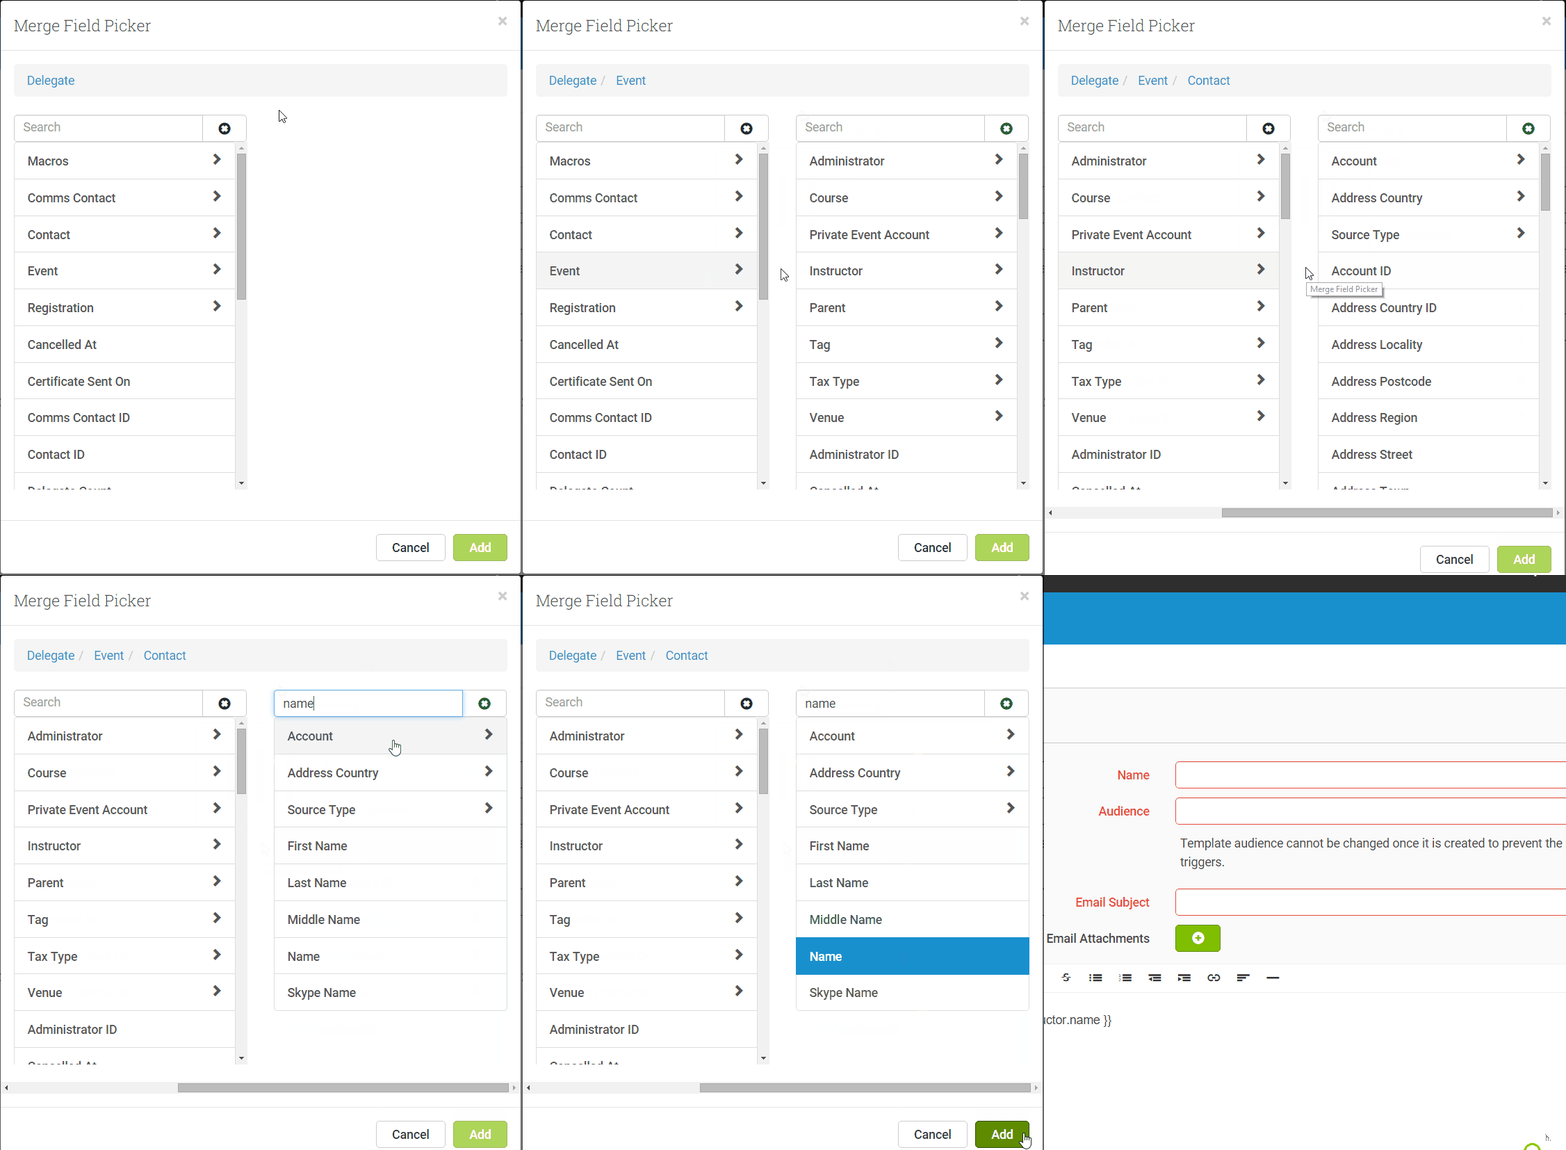
Using the Merge Field Picker to select the Instructor’s name.
Merge Field Macros
Merge Field Macros are sets of instructions that produce a block of information rather than a single value:
| Macro | What it displays |
|---|---|
| All Instructors | A list of all the Instructors attending the Event |
| All Sessions | A list of all the Event Sessions |
| All Students | A list of all the students for the Event |
Advanced date and time formatting
You can configure how dates and times display within merge fields. By default, the system uses the locale of your Events to format dates and times. You should format the date and time according to the country you are offering Events in.
For example, based on a company locale of en_GB:
date - (locale, long)   =  13 December 2013
time - (locale, short)  =  09:00
This section uses the following date and time examples:
{{ delegate.event.end_date | date_format() }}  = for formatting dates
{{ delegate.event.end_time | time_format() }}  = for formatting time
locale
A preset locale can be used to format the date and time:
{{ delegate.event.end_date | date_format(locale, dateformat) }}
{{ delegate.event.end_time | time_format(locale, timeformat) }}
To specify the locale, a 2-letter language code and a 2-letter country code, connected by an underscore, are required. For example:
| Codes | Locale |
|---|---|
| en_GB | British English |
| en_US | American English |
| fr_BE | Belgian French |
| it_CH | Swiss Italian |
date_format
For date_format, the following can be specified:
| date_format | Example output |
|---|---|
short |
4/1/07 |
medium |
4 / 11 / 2007 |
long |
1 April 2007 |
full |
Sunday, April 1, 2007 |
For example, a date_format of en_GB and in long format:
{{ delegate.event.start_date | date_format('en_GB', 'long') }}

= 1 April 2007
time_format
For time_format, the following can be specified:
| time_format | Example output |
|---|---|
short |
11:22 |
medium |
11:22:28 |
long |
11:22:28 +0000 |
full |
11:22:28 GMT+00:00 |
For example, a time_format of en_GB and in short format:
{{ delegate.event.start_time | time_format('en_GB', 'short') }} = 11:22A typical scenario for locale use is if your company is UK-based but runs an Event in the US. Your locale is set to en_GB by default for all your Events. However, you’d want to use the US locale for date/time formatting so that information appears natural for US students, instructors, etc.
Date:
| Default en_GB locale | Output | en_US locale applied | Output |
|---|---|---|---|
| `{{ delegate.event.end_date | date_format() }}` | 20 December 2013 | `{{ delegate.event.end_date |
Time:
| Default en_GB locale | Output | en_US locale applied | Output |
|---|---|---|---|
| `{{ delegate.event.start_time | time_format() }}` | 10:00 | `{{ delegate.event.start_time |
Even more customization options: to customize dates and times further — for example, to list a date without the year — you can replace the short/long options above with your own custom-defined syntax. For the complete list of options, refer to the Babel Pattern Syntax Guide.
Frequently asked questions
Q: What are the merge field mappings for the CRM address fields?
A: The address merge fields available for the CRM use different terminology. Here are the mappings:
| CRM address field | Communication Template merge field |
|---|---|
| Address Line 1 | Address Unit |
| Address Line 2 | Address Street |
| Address Line 3 | Address Locality |
| City | Address Town |
| County / State | Address Region |
| Zip Code | Address Postcode |
Q: How can I remove the merge field instead of showing “None” if the merge field is not populated?
A: You can follow this format:
{{ merge_field if merge_field else "" }}So, an example of that could be:
{{ delegate.event.location_name if delegate.event.location_name else "" }}Q: How can I get the Event Interest Student Name and Email when selecting Audience ‘Booking Recipient’?
A: Use the following merge field syntax:
{% for i in opportunity.interests %}
  {% if i.event %}
    {% for d in i.delegates %}
      {% if d.contact %}
        {{ d.contact.first_name }} {{ d.contact.last_name }} {{ d.contact.email }}
      {% else %}
        {{ d.first_name }} {{ d.last_name }} {{ d.email }}
      {% endif %}
    {% endfor %}
  {% endif %}
{% endfor %}
Related articles
- Communication Templates — template types, audiences, translations, and previewing
- Communication Triggers
- Languages and Translations
- Event Screen — Event Sessions